svitoora – 05 Looking Outwards

World Within: Colored Scanning Electron Microscopes (SEM)

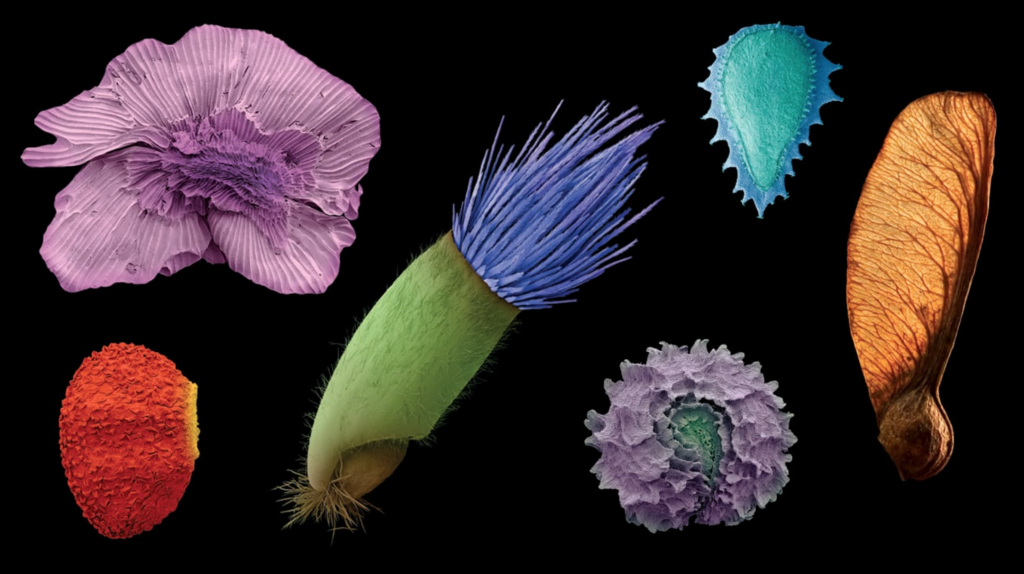
SEM scans of various plant seeds colorized

Colored Electron Microscope Scans are amazing! These were photos I would stare at in the science textbook as a kid. Recently, I came across one of these Scanning Electron Microscope (SEM) scans at the Miller Gallery in the exhibit World Within. Scientifically and algorithmically these scans are generated by using a beam of an electron to scan the surface of the object. In comparison to a beam of visible photons, the electrons’ wavelength is 10,000 times shorter thereby enabling higher precision in vision. The SEM has an electron optical lens which works similarly to a light camera lens to capture the reflected electrons, and afterward through some image processing algorithm, a SEM image emerges. While SEM, allows us to see the world at a whole different level, it only allows us to see that world in black and white because of the nature of electrons’ micro wavelength. Without the artist’s sensibility, these scans would just be mere black and white photos. Today, the common practice of coloring a SEM photo is still via Photoshop or other feature detection software.

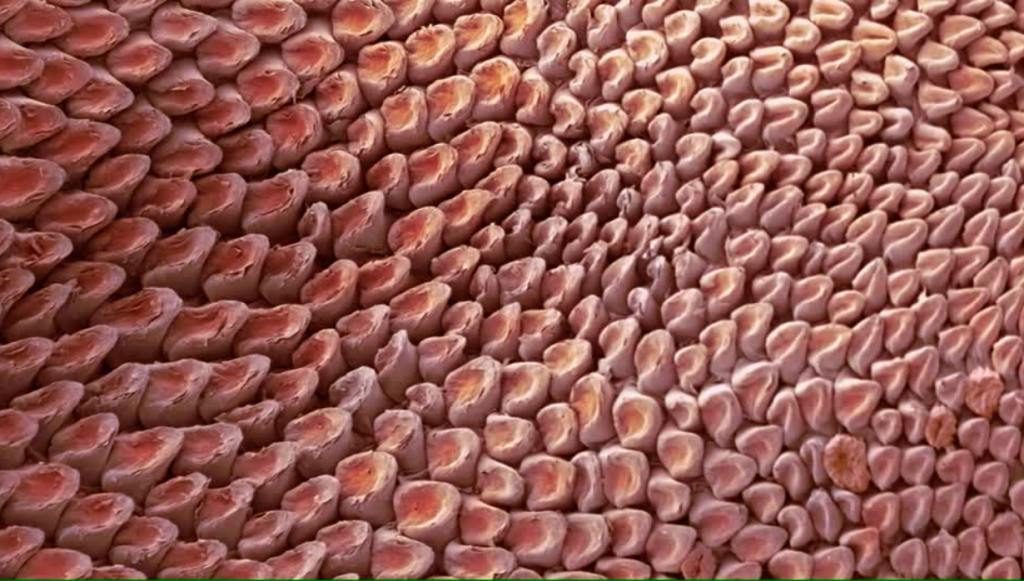
Tongue of a domestic cat

Tardigrade

PHOTOSHOP FOR THE SCIENTIST:
https://www.youtube.com/watch?v=pp0sisFQ53M

hdw – Project 5 – Wallpaper

sketch

//Helen Wu
//Section A
//hdw@andrew.cmu.edu
//Project 5 

function setup() {
    createCanvas(400, 400);
    fill(255)
}

function draw() {
  var x = 10 //x-center for yellow circle
  var y = 10 //y-center for circle
  var r = 5 //radius for all circles
  var spacing = 20 //spacing between each tile
  var lx //pink lines


//draw the lines that divide each column of flowers
for (var lx = 20; lx <=400; lx+=spacing){
  stroke(255,200,241);
  line(lx,0,lx,400);
}

//leaves and leaf lines
for (var b = 1; b<=400; b+=spacing){
  for (var a = 1; a <=400; a+=spacing){
    fill(147,216,140);
    noStroke()
    quad(a,b, a,3+b, 6+a,6+b, 3+a,b);
    stroke(7,89,0)
    strokeWeight(1)
    line(a,b,6+a,6+b)
  }
}


//yellow circles
for (var y = 10; y <= 400; y+=spacing){
  for (var x = 10; x <= 400; x+=spacing){
    fill(255,249,100);
    noStroke();
    ellipse(x,y,r,r);
  }
}

//bottom flower petal
push()
translate(0,5);
for (var y = 10; y <= 400; y+=spacing){
  for (var x = 10; x <= 400; x+=spacing){
    fill(255,0,63);
    stroke(255,200,241);
    strokeWeight(1);
    ellipse(x,y,r,r);
  }
}
pop()

//top flower petal
push()
translate(0,-5);
for (var y = 10; y <= 400; y+=spacing){
  for (var x = 10; x <= 400; x+=spacing){
    fill(255,0,63);
    stroke(255,200,241);
    strokeWeight(1);
    ellipse(x,y,r,r);
  }
}
pop()

//right flower petal
push()
translate(5,0);
for (var y = 10; y <= 400; y+=spacing){
  for (var x = 10; x <= 400; x+=spacing){
    fill(255,0,63);
    stroke(255,200,241);
    strokeWeight(1);
    ellipse(x,y,r,r);
  }
}
pop()

//left flower petal
push()
translate(-5,0);
for (var y = 10; y <= 400; y+=spacing){
  for (var x = 10; x <= 400; x+=spacing){
    fill(255,0,63);
    stroke(255,200,241);
    strokeWeight(1);
    ellipse(x,y,r,r);
  }
}
pop()
}

This week’s project was inspired the small patterns on early settler’s clothes in the west. I guess I kind of miss home. :’)

I drew on the back of a Fuku Tea receipt to plan out the shapes. I struggled with the leaf placement variables but figured it out.

selinal-Project-05

sketch

//Selina Lee
//Section C
//selinal@andrew.cmu.edu
//Project-05

function setup() {
    createCanvas(480, 360);
    background(255, 255, 120); //light yellow background

    for(var row = 0; row < 60; row++) { //creating grid of 60x80 for design
    	for(var col = 0; col < 80; col++) { 
    		stroke(230, 230, 150, 40); //light beige stripes
    		strokeWeight(3);
    		line(col*6 + 3, 0, col*6 + 3, width); //spacing the stripes 6 units apart and centering the space by three units from the origin

    		push(); //start of a rotation
    		noStroke(); 
    		fill(255, 200, 150, 150); //orange hue
    		rotate(radians(32)); //rotate the shape by 32 degrees
    		ellipse(row * 20 + 12, col * 40 - 260, 7, 3); //diagonal rows of ellipses more in the horizontal direction that are 20 units apart
    		rotate(radians(70)); //rotate shape by 70 degrees so that it is in a more upward direction
    		ellipse(row * 20 - 80, col * 40 - 800, 6, 2); //shifting the ellipse lines up and over to the right more
    		pop(); //confining the rotation
    	}
    }

    for(var petalx = 0; petalx < 4; petalx++) { //creating flowers with 4 columns
    	for(var petaly = 0; petaly < 3; petaly++) { //flowers in 3 rows
    		noFill();
    		stroke(180, 230, 100); //green flower stems
    		strokeWeight(3); //stroke weight of 3
    		beginShape(); 
    		curveVertex(petalx * 120 + 75, petaly * 120 + 50); //flower stem starting at center point of white ellipse (see below)
    		curveVertex(petalx * 120 + 75, petaly * 120 + 50);
    		curveVertex(petalx * 120 + 65, petaly * 120 + 70); //midpoints of stem where curve shape happens
    		curveVertex(petalx * 120 + 65, petaly * 120 + 90); //other mid point
    		curveVertex(petalx * 120 + 70, petaly * 120 + 110); //finishing point below main shape of flower
    		curveVertex(petalx * 120 + 70, petaly * 120 + 110);
    		endShape();

    		noStroke();

    		fill(255, 255, 250); //main off-white flower center
    		ellipse(petalx * 120 + 75, petaly * 120 + 50, 10, 10); //centerpoint

    		fill(200, 100, 255, 130); //indigo color of flower with 130 transparency to fit in better with opposing color of yellow
    		ellipse(petalx * 120 + 65, petaly * 120 + 45, 20, 5); //three horizontal ellipse petals 
    		ellipse(petalx * 120 + 60, petaly * 120 + 50, 20, 5);
    		ellipse(petalx * 120 + 65, petaly * 120 + 55, 20, 5);

    		ellipse(petalx * 120 + 80, petaly * 120 + 40, 5, 20); // three vertical ellipse petals to show series of abstraction in flower
    		ellipse(petalx * 120 + 85, petaly * 120 + 50, 5, 20);
    		ellipse(petalx * 120 + 80, petaly * 120 + 60, 5, 20);
    	
    	}
    }

    noLoop();

}

function draw() {
}

mjeong1-Looking Outwards-05-SectionA

Green Void / LAVA

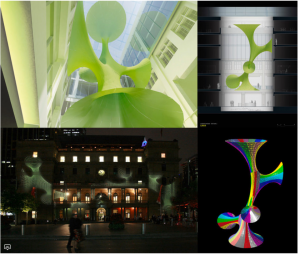
“Green Void” by Architect LAVA in Sydney,Austrailia

The installation Green Void is a digitally patterned product which is located in the main interior atrium of the Customs House. The design process started with 3D computer modelling, and fabricated under a process of computer controlled(CNC) material cutting. The computer model is exclusively based on the simulation of  complex evolving system using certain geometric algorithm, which feeds directly into a production through manufacturing. The design shows a new way of digital workflow by enabling shape of the product to be generated through computational workflow in a extremely shot time.

What I admire about this project is how rendered 3D graphic image looks similar to final installation and how the 3d image can inform people about the final work even before the fabrication. It might be impossible to have this indirect experience of the space without the computer generated image. Especially in the field of architecture, design through computer graphic can be a core of design process since it is much easier to explain your project through visual representation and also you can have feedback in a relatively short time.


link to original

hannahk2-Project-05

sketch            

//Hannah Kim
//Section A
//hannahk2@andrew.cmu.edu
//Project-05

function setup() {
    createCanvas(590, 390);
    noStroke();
}
 
function draw() {
    background(224, 206, 163);
    drawGrid();
    noLoop(); 
}
function drawGrid() {
        //ears
        for (var y = 50; y < height + 50; y += 100) {
        for (var x = 50; x < width + 50; x += 100) {
            var r = map(y, 0, 400, 100, 200);
            var g = map(x, 0, 600, 200, 100);
            strokeWeight(5);
            stroke(r, g, 8);
            fill(224, 206, 163);
            //left ear
            triangle(x-30, y, x-40, y-45, x-10, y-20);
            //right ear
            triangle(x+10, y, x+20, y-45, x-10, y-20);
        }
    }
        //drop shadow
        for (var y = 50; y < height + 50; y += 100) {
        for (var x = 50; x < width + 50; x += 100) {
            //gradates color using mapping
        	var r = map(y, 0, 400, 200, 100);
        	var g = map(x, 0, 600, 200, 100);
            noStroke();
        	fill(r, g, 200);
            ellipse(x, y, 70, 70);
        }
    }
        //face
        for (var y = 50; y < height + 50; y += 100) {
        for (var x = 50; x < width + 50; x += 100) {
        	var r = map(y, 0, 400, 100, 200);
        	var g = map(x, 0, 600, 200, 100);
        	fill(r, g, 8);
            ellipse(x-10, y-10, 70, 70);
        }
    }
        //left eye
        for (var y = 50; y < height + 50; y += 100) {
        for (var x = 50; x < width + 50; x += 100) {
        	var r = map(y, 0, 400, 100, 200);
        	var g = map(x, 0, 600, 100, 200);
        	fill(0);
            ellipse(x-20, y-10, 10, 10);
            //pupil
            fill(255);
            ellipse(x-21, y-12, 2, 2);

            //right eye
            fill(0);
            ellipse(x, y-10, 10, 10);
            //pupil
            fill(255);
            ellipse(x-1, y-12, 2, 2);
        }
    }
        //nose
        for (var y = 50; y < height + 50; y += 100) {
        for (var x = 50; x < width + 50; x += 100) {
            fill(0);
            arc(x-10, y, 5, 5, 0, PI, PIE);
        }
    }

}


This project was kind of fun for me but not really because I dont really enjoy making pattern-based work, but it got me even more familiar with loops which I still seem to be struggling with.

rmanagad-project05-sectione

sketch

// Robert Managad
// Section E
// rmanagad@andrew.cmu.edu
// Project-05-Wallpaper


//colors

var petalGR = 47;
	petalGG = 168;
	petalGB = 144;
var petalRR = 239;
	petalRG = 119;
	petalRB = 99;

var petalXL = 15; // left petal X-co
	petalYLR = 21.5; // left petal Y-Co; right petal Y-Co
	petalXM = 21.5; // middle petals X-Co
	petalYMT = 15.5; // top middle petal Y-co
	petalYMB = 27.5; // bottom middle petal Y-co
	petalXR = 27; // right petal X-co

//size of petals

var petalW = 4.6
var petalH = 12.3

var spacingX = 30; // x-displacement between row elements
	spacingY = 30; // y-displacement between row elements

function setup() {
    createCanvas(300, 300);
    background(252, 241, 235);
    noLoop();
}

function draw() {
	for (var y  = 0; y < 12; y++) { // 12 iterations of rows
        for (var x = 0; x < 12; x++) { // 12 iterations of columns
        	if (y % 2 == 0 & x % 2 == 0) {  // only the even rows of this variant are drawn
        		var Lpy = (petalYLR + y * spacingY) * (sqrt(3)/2); 
        		var Tpy = (petalYMT + y * spacingY) * (sqrt(3)/2);
        		var Bpy = (petalYMB + y * spacingY) * (sqrt(3)/2);
        		var Rpy = (petalYLR + y * spacingY) * (sqrt(3)/2);
            	var Lpx = (petalXL + x * spacingX) - 5; 
            	var	Tpx = (petalXM + x * spacingX) - 5; 
            	var Bpx = (petalXM + x * spacingX) - 5; 
            	var Rpx = (petalXR + x * spacingX) - 5; 
            	var	petalRR = 239;
				var	petalRG = 119;
				var	petalRB = 99;
            }
            else if (y % 2 == 1 & x % 2 == 1) { // only the odd rows of this variant are drawn
            	var Lpy = ((petalYLR + y * spacingY) * (sqrt(3)/2)); 
        		var Tpy = ((petalYMT + y * spacingY) * (sqrt(3)/2));
        		var Bpy = ((petalYMB + y * spacingY) * (sqrt(3)/2));
        		var Rpy = ((petalYLR + y * spacingY) * (sqrt(3)/2));
            	var Lpx = ((petalXL + x * spacingX) - 5); 
            	var	Tpx = ((petalXM + x * spacingX) - 5); 
            	var Bpx = ((petalXM + x * spacingX) - 5); 
            	var Rpx = ((petalXR + x * spacingX) - 5); 
            	var	petalRR = 47;
				var	petalRG = 168;
				var	petalRB = 144;
            }
            	noStroke();
				fill(petalRR, petalRG, petalRB);
				ellipse(Lpx, Lpy, petalH, petalW); //left petal
				ellipse(Tpx, Tpy, petalW, petalH); // top petal
				ellipse(Bpx, Bpy, petalW, petalH); // bottom petal
				ellipse(Rpx, Rpy, petalH, petalW); // right petal
        }
    }
}


I played with several ideas for my background — from merit badges to patchwork — before settling on my final concept: clover petals. I wanted to explore using nested loops and if/else statements to control where elements would appear, and how they can be controlled to do just that. I used Illustrator to plan out my composition beforehand, in addition to primary sketches.

ssharada-project-05

sketch-511.js

//Shariwa Sharada
//Section A
//ssharada@andrew.cmu.edu
//Project-05


function setup(){
	createCanvas(480,480); //background sizing 
	
} 

function draw(){

	background(255);
	
	for(var y = 4; y< height; y+=10){
		strokeWeight(2);
		stroke(255, 188, 0);
		line(0, y, width, y); //background horizontal lines
	}

	for (var a = 7.5; a<width; a+= 100){
		for (var b = 10; b<height; b+= 100){
			fill(0, 152, 255, 190); //using transparencies to show overlaps in shapes 
			noStroke();
			rect(a,b,50,50) //creating the blue coloured squares
		}
	}
	
	for (var s = 16.5; s<width; s+= 100){
		for (var t = 19; t<height; t+= 100){
			fill(255, 0, 0, 150 );
			noStroke();
			rect(s,t,50,50) //creating the red coloured squares
		}
	}

	for (var c = 50.5; c<width; c+= 100){
		for (var d = 1; d<height; d+= 100){
			fill(155, 4, 148, 120);
			noStroke();
			rect(c,d,25,25) //creating the smaller purple coloured squares
		}
	}

	for (var e = 14.5; e<width; e+= 100){
		for (var f = 66; f<height; f+= 100){
			fill(0, 255, 230, 120);
			noStroke();
			ellipse(e,f,25,25) //creating the larger cyan circles 
		}
	}

	for (var g = 20.5; g<width; g+= 100){
		for (var h = 86; h<height; h+= 100){
			fill(0, 255, 0, 120);
			noStroke();
			ellipse(g,h,10,10) //creating the smaller green circles 
		}
	}

	noLoop();
}

For this project I wanted to play with the overlapping of colours and shapes and lines to see what new objects were created. To do this I started off with the idea of the sketch you can see but decided to change some elements because the whole wallpaper ended up coming out to be too symmetrical. I played with the alpha levels of all the colours to allow the overlaps between the shapes to create new colours and additional spaces.

looking-outwards-05-ssharada

Absolut Amber from ZEITGUISED on Vimeo.

ZEITGUISED is a collective of international artists and designers working in the fields of sculpture, architecture, fashion and film. Almost impossible to categorise, the Berlin-based studio was founded by German architect Henrik Mauler and American sculpture and fashion designer Jamie Raap in 2001.

The founder was once stated saying “Synthetic poetry and lyrical systems are at the core of what drives our work. It is fair to say that often the music or soundscapes are the origin or pivot of our pieces”

On the outside their projects create a rhythmic, soft flowing fluid, and incredibly tranquillising aesthetic; but in reality are created using technology and synthetic non-physical matter – usually from coded algorithms.
So, when you believe you are seeing silk-like materials, or liquid, natural substances, you’re in fact witnessing pioneering motion graphics accentuated with sound or other stimulus.

Sheenu-Project-05-Background

sketch

function setup() {
    createCanvas(480, 480);
    background("#F9CDAD");
}

function draw() {
	for(var x=0; x<=8; x++){
		for(var y=0; y<=8; y++){
		fill(255);
		noStroke();
		//GUIDE
		//rect(x*60,y*60,60,60);
		//GREEN Lines
		stroke("#83AF9B")
		strokeWeight(8);
		line(x*60,68+y*60,68+x*60,y*60);
		stroke("#C8C8A9")
		strokeWeight(4);
		line(x*60,68+y*60,68+x*60,y*60);
		//RED Lines
		
		stroke("#FE4365")
		strokeWeight(15);
		line(-8+x*60,-8+y*60,68+x*60,68+y*60);
		stroke("#FC9D9A")
		strokeWeight(8);
		line(-14+x*60,-14+y*60,74+x*60,74+y*60);


	}
	}
}

I really aimed to make this background look visually pleasing color-wise. I found a palette online I really liked and used it to color this striped background. I think it looks really nice and looks like a background for a bakery or a candy. I would totally wear a texture like this around school. I made the canvas 480×480 and divided it by 8 giving me 60, meaning that 64 60×60 squares will fill the whole entire canvas. I started with a draft rectangle and worked on the texture from there.

eeryan-Project05-wallpaper

sketch

//Erin Ryan
//lab c
//eeryan@andrew.cmu.edu
//project-05-wallpaper
var offset = 0;

function setup() {
  createCanvas(480,380);
  angleMode(DEGREES);
}

function draw() {
  background(193,222,229);
  matchstick()
}
//draws match
function matchstick(){
     var stickW;
     var stickH;
     var tipX;
     var tipY;
     var tipW;
     var tipH;
     var row = 5;
     for(var y = 0; y < 3; y++){//nested foor loop creates a grid
      if(y%2==0){//offsets even rows by 50
         offset = 50;
       }
       else{
         offset = 100;
       }
       for(var x = 0; x < row; x++){
         stickW = 7;
         stickH = 85;
         tipX = x*90 + 3.5;
         tipY = y*100 + 40;
         tipW = 11;
         tipH = 15;
        //match tip
         noStroke();
         fill(225,61,38);
         ellipse(tipX + offset, tipY, tipW, tipH);
         triangle(tipX - tipW/2 + offset, tipY, tipX + tipW/2 + offset, tipY, tipX- 0.5 + offset, tipY + 30);
        //shade match tip
         noStroke();
         fill(231,82,40);
         ellipse(tipX - .75 + offset, tipY + .25, tipW - 5, 12);
         //draw match stick
         noStroke();
         fill(190,169,130);
         rect(x * 90 + offset, y * 100 + 50, stickW, stickH,0,0,45,45);
         //shade match stick
         noStroke();
         fill(219,191,149);
         rect(x * 90 - 1 + offset, y*100 + 50, stickW-1.5,stickH,0,0,45,45);
     }
    }
}

I started by making my match image in Illustrator, and I took the dimensions of the graphic from that. I enjoyed coming up with the artwork for this project, but I had a lot of difficulty implementing it into a pattern. I originally had my nested for loop in my draw function, but when I called it it wouldn’t produce a grid, like it would if I just drew a rectangle in the loop, which I think was because of the way some of my variables were defined in the function. I eventually figured out how to tweak my code within my matchstick function to create the pattern I wanted.